|
What the heck is a cut-out raiser??
Updated Jan 23, 2001
*Turbo Gus Mahon,
unfortunately, is no longer with us. He was killed in late
Summer 2002 in a motorcycle accident. He was quite an inventive
person and was able to propel his 2.5L Turbocharged Dodge
Caravan into the 13's at the dragstrip, frustrating many
musclecar owners to no end. We will be reprinting some of his
more generic articles mainly due to the great information they
provide. We are extremely sorry to hear about the tragic
accident that took his life, but will remember always the
contributions he has made to the hobby. The following is the
article in full along with how the results were derived.
When you
are manually raising the boost on a Mopar turbo car (and many
other brands, too!) you quickly discover that at some point
above stock boost levels the engine will SHUT clean off (or "CUT
OUT"). It's very annoying, to say the least. In our beloved
Mopar FWd turbo cars cut out is most often at 14.7 psi. The
computer can't recognize boost levels above 14.7 psi, so it
shuts your motor off if you try to go higher.
We can fool the MAP sensor into telling the computer that
we're still below 14.7 psi. We can keep the pressure down in the
MAP sensor line with this device which raises the cut-out point,
or eliminates it (if you want to go that radical).
Making a
Cut-out Raiser
Because of
legalities, I can only suggest this as an off-the-road mod.
Attempt this at your own risk.
McMaster-Carr
sells the un-modified valve as part number: 48935K25
Modify as follows:
First take the stock valve, disassemble it by unscrewing it, and
re-assemble it with the steel ball moved to the OTHER side of
the spring. The steel ball will now be on the red-threaded end
of the valve.
Then get a screw-on barb (McMaster-Carr part# 5346K51) and screw
it onto the red-threaded end.
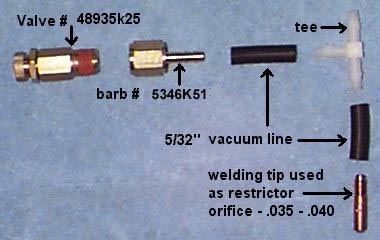
...and put
together a couple of short pieces of vacuum line, a tee, and a
restrictor orifice (brass piece with pinhole in it).
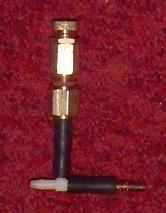
I pick up welding tips at a local welding store. That's one in
the picture above. Below is a completed valve.
WARNING!! The restrictor orifice (or welding tip) should be
.040" to .050" A small orifice, like some stock ones, will cause
the "check engine' light to come on. The illustration above
shows .035" as the smaller limit, but actually .040" to .050" is
better.
INSTALLING the cut out raiser
If you
have the old style logic-module-in-the-kick panel setup, then
you put this device in the car, or underhood.
In the car: splice into the vacuum line that goes to the MAP
sensor - logic module. Pull back the passenger's side footwell
carpeting, or remove the kick-panel. Splice in the cut out
raiser with the white nylon connector facing the MAP sensor. Of
course the brass restrictor points the other way!
Under the
hood: Splice into the vacuum line close to where the vacuum line
for the MAP goes through the firewall. Splice into the line near
the firewall with the white nipple facing the firewall, and the
brass nipple towards the barometric solenoid.
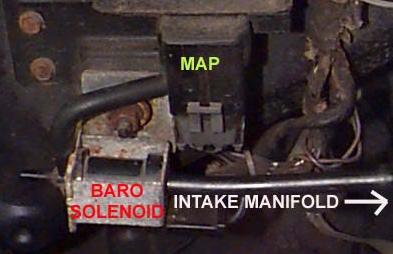
If
you have the newer style barometric solenoid/MAP sensor together
under the hood, think of the baro/MAP combo as one device. Cut
the vacuum line close to the baro/MAP sensor, and splice in the
cutout raiser device with the brass nipple towards the intake
manifold, and the white nylon nipple towards the MAP
sensor/barometric solenoid combination.
Minivan before:
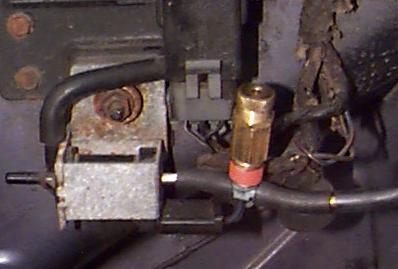
Minivan after:
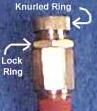
DIALING IN the installed unit
After
installation, screw the knurled knob almost all the way in, and
the car will still cut out around 15 psi. Loosen the lock-ring,
and unscrew the knurled brass knob a half-turn. Re-tighten the
lock-ring. After you do this a few times, you�ll notice that the
cutout point gets higher. You can stop at 16, or 18, or whatever
you want, BUT, the higher you go, the more fuel you have to add.
Set it as
low as you can get away with, because your computer will give
you NO MORE fuel past14.7 psi. The computer will believe that
you�re never going over 14.7 psi!
If you have a rich-lean gauge, back off when the gauge
indicates that you are NOT rich!
If you have no gauge, run a wire from your O2 sensor wire (the
one that reads .1V-.9V at warm idle, bouncing up and down)
through the firewall, into the car. Hook the O2 wire to the red
probe of a digital voltmeter; hook the black probe of the
digital voltmeter to a clean ground. When you floor it, you want
to see .87V to .97V. Less than .87V means you�re not safely
rich. Back off, and add fuel.
You can add fuel by raising the fuel pressure, adding an
extra injector, or switching to slightly larger injectors. If
you don�t add any fuel, don�t run high boost! I can usually run
15 psi on the stock setup.
FINISHED!
Here's a
simpler MAP bleed without the Grainger valve. You need a needle
valve, and a restrictor orifice instead.
The Grainger valve set up will leave you at full richness
until you hit14 psi or so. Then you'll begin to lean out.
This needle valve set up will lean you slightly all the
way through your boost curve. If you're running too rich from
big injectors, this needle valve set up is better for you. If
you want to raise the boost just2 or 3 psi past cut out, this
will be good for you, too.
NEITHER set up will affect idle, gas mileage, or part
throttle cruise. They only come into play when you go into
boost.
Do NOT
open the valve much to start with. Just open it enough to bring
your cut out point a little higher. The brass needle valve can
be replaced with another simple restrictor orifice. The smaller
the orifice, the less raising of the cut out point; the larger
the orifice, the more raising of the cut out point.
If you are running computer controlled boost, this needle
valve mod will *also*raise your boost level!
I designed this set up for manually boosted cars.
Computer controlled cars will see a rise in their boost. Will
make a fun experiment. Just go easy on the throttle 'til you see
where your new boost level is. If you don't bleed much, the
boost won't go up much. And you *don't* want to bleed much...
| 